Planning a Radiant Floor System Design
This blog seeks to simplify how to start your radiant heat system design and install process. Keep reading for some Design and Construction Suggestions. Designing a system might be easier than you think.
Estimate Your Heating Requirements
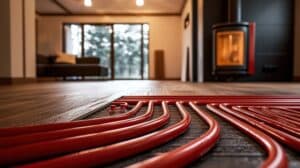
Under floor radiant heat uses the floor to heat the area above by raising the floor in temperature until the heating output of the floor matches the amount of heat that the building is losing. We need to estimate the heat loss of the building so that we can estimate the floor temperature that will be needed to do the job. Then we can go about the task of deciding which radiant method to use and what the tube spacing, and fluid temperatures should be in order to do the job in the most efficient manner.
Determine the Heating Requirements per Square Foot
The chart below is a rough “rule of thumb” guide for assessing a building’s heat loss. It does not take the place of a heat loss analysis but can be useful in making preliminary decisions.
Definition: BTU stands for British Thermal Unit and is the amount of heat needed to raise one pound of water one degree Fahrenheit.
| INSULATING VALUE OF THE BUILDING | HEAT LOSS in BTUs PER HOUR PER SQ. FT. |
|---|---|
| SUPER INSULATED (very high R-values; R#) walls, R50 ceilings, high performance windows, .25 air changed per hour or better, exceeds modern energy codes) | .1 BTUs per hour per square floor of floor area per degree F. |
| GOOD (high R-values; R19 walls, R38 ceilings, high performance windows, tight construction, typical of new buildings meeting modern energy codes) | .3 BTUs per hour per square foot of floor area per degree F. |
| FAIR (typical of well maintained existing structures) | .6 BTUs per hour per square foot of floor area per degree F. |
| POOR (poorly insulated, leaky construction) | 2 BTUs per hours per square foot f floor area per degree F. |
Example: What is the heat loss (per square foot) of a building with ”good” insulating characteristics when it is 65 degrees F. inside and -10 degrees F. outside?
Answer: 22.5 BTUs /hr/sq ft (heat loss x temperature difference) (.30 BTUs /hr/ft sq/degree f x 75 degrees F.)
Multiply Heat Loss by Temperature Difference
The chart below shows that a floor temperature of 80°F. will be adequate to put out 27 BTU’s per hour. This will be enough to heat a building with “good” insulation when it is well below zero. Nearly all residential buildings and most commercial buildings are built to this standard today.
To size the heating source, simply multiply your heat loss per square foot by the area (in sq. feet). You will need a heater or boiler with this rated output.
Use this chart to see what the temperature of the floor must be to heat the building when the outside air is at the coldest expected (design temperature).

Determine Your Heat Output
Use the graphs below to predict the amount of heat that you will get from the floor. Heating outputs greater than 45 BTU’s per hour cannot be achieved without floor temperatures greater than 90°F. Use supplementary heat in those rare cases where more than 45 BTU’s/square ft are required or better still, invest in energy conservation measures. Radiant ceiling or wall heat, when used as a supplement, will provide exceptional comfort.

What should you do if you are not sure that you will get enough heat from the radiant floor?
This happens occasionally and there are several solutions.
- Lower the heat loss with energy efficiency measures like more insulation or better-quality windows (this is the best solution).
- Look at another radiant heating method that puts out more heat than what you were thinking about first. A slab or suspended slab will put out more heat than joisted floors.
- Use supplemental radiant wall heat or radiant ceiling heat (extremely comfortable).
- Use a supplemental heating source for very cold days, like a woodstove, gas fireplace, or supplemental baseboard heat.
Maximum Floor Temperatures
Floors should not exceed 80° Fahrenheit on a routine basis and should never exceed 85° Fahrenheit.
Recommended Tube Spacing
These tube spacing will provide comfortable even heat within the limits of the fluid temperatures that are desirable.
| Tube Diameter | Recommended Spacing |
|---|---|
| 1/2" | 8"-12" |
| 5/8' | 8"-14" |
| 7/8" | 12"-16" |
Calculate the Amount of Tubing Required
Determine the total length of tubing needed by multiplying the floor area (in square feet) by the multiplier shown for your tube spacing. If the tubing will be spaced at 16” on center, multiply the floor area by .75.
|
Floor Area |
Spacing Multiplier |
|---|---|
| 16" on center | .75 |
| 14" on center | .86 |
| 12" on center | 1.00 |
| 10" on center | 1.20 |
| 9" on center | 1.33 |
| 8" on center | 1.5 |
| 6" on center | 2.0 |
EXAMPLE: A 1,000 sq ft area requires 750' of tubing if spaced 16" on center (1,000 x 75)

Circuit Lengths and Flow Rates
It is desirable that circuit lengths be neither too long nor too short. The purpose of the tubing is to allow water (or another fluid) to pass through it and lose heat as it goes along. This heat is received by the floor which then heats the building. If the tube length is too long, there will be a tendency for the water to lose too much heat before it reaches the end of the run. The result is tubing at the end of the circuit is exposed to water that has already lost much of its heat and the tubing is then “loafing”. You can make up for this by increasing the fluid velocity with a larger pump. At some point, the water becomes too turbulent and pump work and electricity consumption become unreasonable. In extreme cases, erosion corrosion can occur (the physical wearing away of system components) because of flow that is too turbulent.
Circuit lengths which are too short tend to run in laminar flow (smooth flow) which does not exchange heat quite as well as a slightly turbulent flow. One nuisance of slow flow is the possibility that air bubbles could collect in some tubes and reduce effectiveness or even block flow.
The goal is to have the fluid come out of the tube within 10-15 degrees of the temperature it went in at and move at a slightly turbulent flow as it passes through.
|
Tube Diameter |
Min Length |
Max Length |
Flow Rate |
|---|---|---|---|
| 1/2" | 100 ft. | 300 ft | .25 gpm/100' of tube |
| 5/8" | 150 ft. | 300 ft. | .33 gpm/100' of tube |
| 7/8" | 200 ft. | 400 ft. | .5 gpm/100' of tube |
Ready to experience the future of heating?
Don’t wait—take the first step today. Whether you’re a contractor or wholesaler, NextGen Boiler is here to meet your needs with innovative, reliable, and efficient solutions.